Psalm 45:11-Let the king be enthralled by your beauty; honor him, for he is your lord.

Hello and welcome to the world that is Miss Dress Up. I'm a follower of Jesus, a Wife, Mother, YouTuber, Blogger, Facebooker and lastly but not least(ly) a make up artist in the making. Helping someone feel good about themselves,inside and out, makes me happy and I want to do that to the best of my ability. I make it a point to learn more everyday about the field of make up artistry through YouTube videos, books, magazines, other websites and anything else I can get involved in. This is an adventure I've always wanted to go on and at the ripe old age of 39 I am finally able to do that. So if you want to walk with me as I learn and grow and help others do the same you are officially invited by me right now!

Search This Blog

Wednesday, December 8, 2010

Rockin' Around the Rite Aid Deals

....and my Sister can sing you the song if you like.  HA HA HA.  Maybe I can get her to record herself singing it and I'll post it on YouTube for you.  Well....I can try anyway!
New video on my Rite Aid deals:http://www.youtube.com/watch?v=1i8IHy7bKMk
So...I "happened" to get to go to Rite Aid today.  If you know me at all you know that's one of my favorite past times.  Rite Aid, Walgreen's, CVS, I'm not picky!  My Husband needed something for his headache that he could take back to work with him so I "had" to go.  HA HA.  And while he looked for the proper medication to treat his headache I feverishly, and expertly I might add, perused the cosmetics aisles.  I had just enough time to grab a few great deals and here they are: I found these two items packaged together, full size of the blow dry lotion and a 3 oz of the flat iron balm, for $6.49.  Very good deal since the full size alone is $6.49!  We can all rock around that right?

I've been looking for this for about a month now. I can't wait to try it on my super unruly hairs tomorrow!  I'll let you know how it works out.

Next I found these little beauties.  Prestige makes a great water proof lip liner and today I found a Kohl eyeliner pencil that seems like it will work well for those days when I just want a good "smudge-able" pencil type eyeliner or I only want to darken my lash line but not have a definite "eyeliner look".  I got one in the color "black" and the other is called "masquerade" which is a beautiful purple color.  I also swatched the two lipliners I got last month and the pink one I got last summer because they are all Prestige brand.  Here's what they look like on the back of my hand:
L to R: Waterproof Prestige lip liners in plummy and mocha.  Masquerade eyeliner and black eyeliner.  (I made two marks with the black pencil).  The far right is a Prestige regular lip liner in Love which is a pretty candy pink.  I got that one last summer.

I also bought a Styli-Style felt tip liquid eyeliner in Blackest Black.  I didn't swatch that one because I forgot.  Sorry...I will be using it in a video soon however.  I also want to do a little "experiment" with it to see if it flakes and a few other things so I'll keep you posted on that.  
And last but not least, my new crazy Christmas socks.  You ALL know you want some.  He he he.  
These are the exact socks except mine only come to the ankle. These would be way cooler!  (or warmer...you get the drift)  
Ok, everybody sing it with me now:
"Rockin' around the Rite Aid deals with my happy fuzzy socks..."  Leave me a comment with the next line to the song.
Love and super fuzzy striped green sockies,
Nicole


Tuesday, December 7, 2010

Put some oomph in your face for Hanukkah/Christmas etc!

Hello and welcome back to my itty bitty blog.  Thank you for taking the time to stop in and read what I have to say as well as watch my tutorials.  I really do appreciate it!
Here's the link to my newest video where I go over everything in this blog post: http://www.youtube.com/watch?v=gV7y499yje8
I wanted to first off give you a quick review of a face primer I've been using for almost three weeks now and really liking.  It's the Loreal Studio Secrets Magic Perfecting Base.  I bought mine at Walmart, I can't remember the exact price but Walmart is listing it on their website for $10.94 with free shipping to your home.  Not bad!  I believe I paid almost $12 for it in store so I will be purchasing it online from now on.  Here is what it claims to do on the packaging:


  • Get the perfect skin texture, instantly and all day. Smoothes lines. Hides pores. Banishes imperfections. The silky, lightweight formula glides onto skin, leaving it velvety-smooth to the touch


  • The result- a unified matte finish that's flawless.


  • Suitable for all skin types. Dermatologist tested. Non-comedogenic.


  • I agree with all of that.  My only "issue" with the product is I feel I have to use quite a bit of it and therefore it's disappearing quickly.  BUT I will say that I have many problem areas I am trying to smooth, almost my whole face, so I use it on my entire face.  You may not need to.  I recommend using it in the t-zone to hide large/open pores, any areas where you may have fine lines such as around the eyes (underneath especially) and mouth and in any spots where you may have acne scarring and things like that.  It puts a smooth coat over them and helps your make up glide on easier, smoother and last longer and stops it from sinking into places you don't want your make up to sink into.  It also has a mattifying quality to it so it is helping control oil for me for up to 6 hours.  That IS magic for me!  I have a lot of problem with oil breakthrough with most foundations, even expensive ones that claim to reduce that problem.  So anything that actually DOES work is magic in my book.  


    The remaining items are ideas of products you can use over this Holiday season to give your make up look a bit more "pizazz" for parties etc.  And I wanted to give you some ideas of things you can do quickly and inexpensively because I know not everyone has 2 hours to do their make up for a special occasion.  
    The first one is the Hard Candy bronzer in Tropics that I introduced in my Smashbox/Hard Candy review video and blog.  It's a beautiful golden/bronzey bronzer that, in my opinion, is gorgeous as a highlight on the top of the cheek bone, brow bone and anywhere you want a nice gold highlight.  I wouldn't personally use it on my entire face as I feel I might resemble a pair of gold lame pants...not a good look in my opinion unless you are 20 years old and on the cover of a magazine.  Ahem...here's what it looks like. 


    I did swatches on my finger and hand so you could hopefully see the serious gold-ness goin' on!
     I like this for several different uses.  It serves as a great gold eyeshadow if you're in need of one, highlighter for the top of the cheek bones and even on the lips over your lipstick.  LOVE IT.  


    The next "glitter it up" item on the list is the NYX Candy Glitter Liner in Gold.  It's a very pretty gold glitter in a clear gel.  The glitter isn't too big or too small, it's a nice gold color and it stays put instead of falling all over your face etc.  Have a look:


                                                        The package has a cute black tassle on it.


    This liner comes in 15 colors and all are gorgeous!  There is a link in the description box of the video if you'd like to check that out.  
    The last thing I want to show you is the Loreal Feel Naturale Light Softening Blush in Charmed Peach. #288.  I really like the look and feel of this blusher and it comes in eight different colors on the Loreal website.  http://www.lorealparisusa.com/_us/_en/default.aspx#/?page=top{userdata//d+d//|diagnostic|main:searchresult//keyword+Feel_Naturale_Blush//|media:_blank|nav|overlay:_blank}
    I had a very hard time swatching it for you, sorry.  It's very soft and light on the hand/arm but shows up quite nicely on the cheeks.  Here's the swatch:
    It's quite light looking here. 


    As I said, it's difficult to swatch it on my skin tone but I think you can at least see that it's a soft peach color with a tiny bit of sparkle running through it.  Just enough to give that "she's glowing" look when other's look at you.  I really like this and think I might get a couple of other colors.  I'll let you know.  For some reason they aren't selling it on the Walmart or Ulta websites, I only found it on the Loreal site but I purchased mine at Ulta on clearance.  Hmm....


    Well that about wraps up this edition of how to add a touch of sparkle to your Holiday looks at the speed of lightening and the cost of...well, not much.  ;0)  I hope you all have a wonderful Hanukkah/Christmas/Holiday Season!  Send me some pictures of your holiday looks, I'd love to see them!  God bless you all.
    Sparkles,
    Nicole

    Friday, December 3, 2010

    "Holiday-ify" Your Make Up Fast

    I FINALLY was able to film today and a few people on Facebook seemed "excited" about a Holiday party look so...here it is! http://www.youtube.com/watch?v=UqKseavX8qo
    Christmas/New Years Party Look
    Those of you who see me on a fairly regular basis know that I tend to wear a full face of make up pretty much every day.  I've been doing so since I was a teenager and is just what I like to do.  So this may look "normal" for me but I know a lot of people don't do that.  Here is a small list of things you can do to "amp" up your make up for a party/event:


    1. Be sure your eyebrows are filled in nicely to frame the face and eyes. (go about %20 darker than normal if you're anticipating being in photos)

    2. Powder those oily spots but don't over powder.  You don't want to look powdery, just less shiny. Also, if you don't want to wear actual foundation you don't have to but I suggest covering any blemishes/discoloration with either a concealer of the same color as your skin and powder or using a tinted moisturizer which is a lot lighter than a full foundation and will give you enough coverage if your skin is mostly good.

    3. Lashes and Lash line. If you're "upping" your make up you want to be sure your lashes and lash line don't disappear.  Use a darker color eyeliner right on the lash line.  Curl those lashes! False lashes really say "PARTY" and are fairly inexpensive.

    4. Lips-it doesn't have to be bright red lipstick for it to say "Christmas" but be sure to put at least a little color there.  Even if it's just a colored lip balm. Nothing at all on the lips makes you look pale and like you're not feeling well.

    5. All over glow-a nice light dusting of something shimmery or even something with superfine glitter in it looks pretty but if you're anticipating pictures be sure to concentrate anything shimmery/glitter to natural highlight areas such as the top of the cheek bones, brow bone and inner corner of the eyes.  Never shimmer up your oily zones.  Just makes it worse.  BE SURE TO ADD BLUSH to the apples of your cheekers so you don't look washed out.

    6. Make up setting spray if you'll be out for a long time.  (over 4 hours) or for dancing etc.

    7. Jewelery is always a nice addition even if you're not super dressed up.  You can dress up any outfit with a few nice pieces of jewelery like earrings and a bracelet or necklace.
     Please excuse the crazy hair today....


    I know, I know...I said the eyeshadow was black in the tutorial but it's actually BLUE.  Epic fail..

    Thursday, December 2, 2010

    Christmas Gift Ideas for the Gift Challenged

    Hi Everyone!  I've been seeing so many things lately that I would LOVE to have but will not buy for myself because....IT'S CHRISTMAS TIME!  Time to buy for others.  And I'm guessing a lot of you are the same way.  So...if you have that woman/girl on your list who needs/wants/can't live without some new cosmetics here are a few ideas from "the peanut gallery".  AKA, me.

    Sephora gift card- if you aren't sure what to get OR one of the hottest things going, gift wise, at Sephora right now is the Tarte Cosmetics The Jewelery Box.  It's 99% cosmetics but comes with a lovely necklace for your gift recipient to wear.  It's an amazing value, the cosmetics in the palette are of great quality, all of Tarte's products are formulated without

    - Parabens
    - Sulfates
    - Synthetic Fragrances
    - Synthetic Dyes
    - Petrochemicals
    - Phthalates 

     and just the eye shadows alone would cost you WAY more than the whole palette.  They are all full size!  A grand total of $52.  Awesome!  Here's the link to the page at sephora.com where they give you the lowdown on it-http://www.sephora.com/browse/product.jhtml;jsessionid=NS01RTV0SATD4CV0KQNQX0Q?id=P275305&categoryId=C7010


    An Ulta gift card-
    (http://www.ulta.com/ulta/browse/category.jsp;jsessionid=923FFC26344206947C846EDF85B97C65.p-a2-app2?categoryId=cat120341)

    Ulta has a plethora of all things beauty including high end brands such as Urban Decay, Tarte Cosmetics, Two Faced Cosmetics, Smashbox and many more.  They also carry drug store brands such as Loreal, NYX, Palladio, Revlon and more.  They carry tons of hair styling tools and products, they have a salon and the list goes on and on.  Perfect gift!

    Mac gift certificates-
     http://www.maccosmetics.com/giftcards/about_giftcards.tmpl?CATEGORY_ID=CAT792

    OR they have an entire line out for Christmas right now called A Tartan Tale.  You can check that out here: http://www.maccosmetics.com/whats_new/4038/index.tmpl  The packaging is all super cute and functional and the products are the usual high quality you expect from Mac Cosmetics.


    Gift certificates- for manicures, pedicures, deep conditioning treatments for the hair, any other services the girl in mind may use such as waxing, Brazillian Blow Out (hair), massages, spa visits, hair color/cut, facial treatments or, if you live close to me, a gift certificate for a makeover and 1 lesson on either eye make up suitable for their eye shape, color and age or foundation routine suitable for their skin type,color and age.  $20.  I also have a photographer who will take 1 pose of the woman/girl after her makeover and lesson and give the person 1 8x10 photo.  The package, makeover/lesson and photo, is $35.  If purchasing the makeover/lesson only I will need 7 days advance notice and for both we need 10 days advance to book the photographer.  (she's a busy woman!  ;0))

    Another idea for a woman/girl who enjoys curling her hair would be this new(er) item on the market:

    This is called a "curling wand".  It's clipless and creates beautiful curls of lots of different sizes depending on the way you wrap the hair around it.  This one in particular is a Remington TStudio Ceramic Pearl Professional Curl Wand.  (the name could be a wee bit longer eh? HA HA)  This one I found at www.target.com for $24.95.  You can get much more expensive ones at places like www.beautychoice.com.

    There are so many things out there that are "new" and exciting and "must have" items that if I tried to list them all here...well, it just wouldn't be possible.  These are just a few things to get you started.  Ladies, show these to your family members to give them ideas (they may be clueless as to what to get you and would be relieved to have links and a photo or two of what to get).  Family members, run out and buy them all for me!  JUST KIDDING.  I hope this helps.  If you need anymore ideas please let me know.  God bless you all and have a very Happy Hanukkah and Merry Christmas!

    Monday, November 29, 2010

    Got those under eye blues?

    Hi guys!  Sorry for being MIA for a week.  We had a house guest for a week plus the hustle of Thanksgiving, Black Friday etc.  Whew....this is my first day to actually sit down and check email, youtube etc.
    (I didn't figure anyone would want to be "featured" on my blog so I used this photo)
    Someone on Facebook asked about concealing under eye circles, darkness and puffiness.  I was going to film a short video on it but I thought I could actually get the information collected better for you here.  So here goes!

    Let's start with a listing few common issues women have with their under eye area, then I'll explain a few things you can try for each issue.
    1. Puffiness
    2. Darkness/Bluish cast
    3. Fine lines
    4. Make up creasing
    5. Eye liner/mascara smudging

    First off I want to say that your skin type greatly affects the types of products and techniques you use to correct any of these issues, much like your foundation/powder etc.
    PUFFINESS-Puffiness is pretty much the only thing you can "treat" the same no matter what skin type you have however.  The only thing I've found that actually worked as far as puffiness goes was applying a cold/cool compress of some sort to the area for at least 10 minutes each eye.  You can use a small ice pack, frozen spoon covered by a light cloth or any other cold item.  Just be sure you aren't leaving it on too long...frozen bags under your eyes would be far less attractive than the ones you start with.  ;0)  However, if the puffiness is not due to lack of sleep etc and is just naturally there all the time there's not really much you can do.  You do, however, want to be VERY careful with any concealers, powders, products in general you place under your eye as to not accentuate the puffiness.  Remember the rule: Light color highlights or brings forth a feature and dark color conceals or recedes a feature.  This is not to say you should apply black under your eyes to recede the puffiness, that may cause you to resemble Captain Jack Sparrow.  Ahem...unless that's the look you're going for.  You do want to be very careful not to put something too light under your eyes is what I'm getting at.  That will only enhance the puffiness.
    DARKNESS/BLUISH CAST-There are many awesome products out there that will help with this concern.  I struggle with a blue cast in the inner corners of my eye, near the bridge of my nose.  You want to use something with a salmon and/or peach tint to it which will counteract the blue/dark colors.  When choosing a concealer for under your eyes (or anywhere else for that matter) be sure it matches your skin tone exactly, is creamy and not thick.  Here is a short list of salmon/peach concealers that work wonders!
    Eve Pearl Salmon Concealer/treatment-http://www.evepearl.com/products/concealers-salmon/Dua_Salmon_Concealer_and_Treatment_Light_Medium.htm
    *in my opinion Eve Pearl has the market on this type of product.  It's not only an amazing concealer but actually treats the skin to improve it as it conceals.  You can also just buy one color or the dual product so you can insure you have the right color.  (you can mix the two to custom blend your color)  They also come in a wide range of colors, are very creamy, non-drying and do not cause oiliness.
    BONUS TIPS:http://www.evepearl.com/index.php?section=articles_zoom&TAG=ARTICLE17
    Graftobian  HD Creme Corrector - Soft Orange (Blue Neutralizer)https://www.graftobianmakeup.com/commerce/product.jsp?prodId=1893&catId=
    *this is also a good corrector. It's creamy (you don't want a thick, cakey concealer for under your eyes), non-drying, doesn't cause oiliness and has great coverage.  The only "down" side to this one is it only comes in light/medium or medium/dark so it may be a little more difficult to find your proper shade.
    Bobbi Brown tinted eye brightener, creamy concealer and brightening spot treatment corrector-This is quite a pricey product, however it works miracles.  There is a short video on how to use her products here:http://www.bobbibrowncosmetics.com/learn/video.tmpl?cm_sp=NOV2010-_-Home-Menu-_-CorrectorVideo_FTout#
    Benefit's Erase Paste-http://www.benefitcosmetics.com/Benefit-erase-paste/dp/B0011UNTJ2
    *This is also a great product but it takes a little more "working with it" to get the proper coverage.  It also only comes in three shades- fair, medium and deep.  You may have to purchase two and mix them to get the right shade.
    I know there are many more out there but these are the ones I would recommend trying first as they are the "top" in this area.
    FINE LINES-The main key to reducing the appearance of fine lines is to be very careful not to accentuate them first of all.  Products that havM a thick consistency will crease in fine lines and powders will settle into them causing them to be more visible.  The way I diminish mine (as well as the darkness at the same time) is as follows:
    1. Hydrate!  I can't stress that enough.  Even if you are A. young B. oily skinned by nature you still need to hydrate under your eyes.  It's the only place on your face that doesn't have it's own means to do so.   Think of it this way-have you ever seen a dessert that wasn't cracked and full of deep ruts?  You don't want that under your eyes!  Use whatever moisturizer you are comfortable with and suits your skin type.  Do this at least 20 minutes before you apply anything else to give it time to soak into the skin.  This goes for your whole face.
    2. Prime those lines girls!  And by that I mean use a primer.  This will help fill in the fine lines so when you apply foundation/concealer/powder over them those products won't sink in and accentuate the lines.  I've been using Loreal Studio Secrets face primer for about 2 weeks now and loving it but there is a hole myriad of face primers available.  To name a few: Smashbox Photo Finish, Mac Mattifying Gel (for the oilier skins like Moi), Benefit's PoreFessional (fills in large pores etc), Bare Minerals Prime Time (spray), Eve Pearl's moisturizing primer and many many more.  Be sure to pat the primer under your eyes, all the way up to your lashes and in the inner corners by your nose to create a smooth base for your other products to glide onto.
    3. Before my foundation is applied I begin by correcting the blue cast by applying a THIN layer of my Graftobian soft orange corrector with my ring finger and patting it gently to blend it.  Be sure to blend the edges as well.  The heat from your fingers warms the product causing it to go on thinner and easier.  Remember, we don't want thick and cakey under our eyes.  It only makes the problems worse!  A little goes a long way with this.
    4.  I apply my foundation as normal and powder my face in the areas I need powdering.  (T-zone and under eye)  You always want to set your under eye correctors/concealers with a powder or you will find it "missing" half way through the day and/or creased.  BUT, remember that powders can settle into fine lines and accentuate them if too much is applied.  So I use a Mac 224 (very fluffy eyeshadow blending brush) and dip into a super fine, silky powder like Make Up Forever's HD Powder or Mac Setting Powder and apply that under my eyes only and only enough so it doesn't feel "wet" or sticky anymore.  Be sure to look up to the ceiling so the skin under your eyes is as smoothed out as possible before setting your concealer or you will end up setting the lines into your make up.  Not fun.

    The above routine also takes care of any creasing I may get under my eyes and stops the smearing of eyeliner/mascara as well.  (for me) If you are still having a problem with your eyeliner/mascara smearing under your eyes it may be that you eye shape is such that you need to stay away from liners on the bottom lash line or mascara on your bottom lashes.  Also, if you are going to line your lower waterline be sure to ALWAYS set it with a powder eyeshadow of the same shade.  That will help it stay in place.

    I hope this helps you!  Please let me know if you have any other questions/concerns etc OR if you've tried something not listed here that has worked for you.  I'm sure other readers would be very happy to try them out!  God bless you all.  Love,
    Circle/Puff/Line Free Nicole (he he he)

    Saturday, November 20, 2010

    Smashbox and Hard Candy Reviews


    Hi Guys,
      Thanks a lot for popping over to read my wee little bloggie!!  If you've watched my latest video on YouTube:http://www.youtube.com/watch?v=Lpy92ODdtn4 you already know I've been to Ulta and Walmart.  Two very dangerous places for a make up junky such as myself.  ;0)  I normally only go in Ulta once a month and try to only spend about $20 when I go.  Well...this time it didn't happen exactly that way.  Ahem....you see, I am still building my kit for freelance make up artistry and I am in need of so many things I don't really even know where to start.  On top of the fact that I'm not making any money doing this yet so I'm basically just spending............which is fun but not the best thing to be doing at this moment in me life.
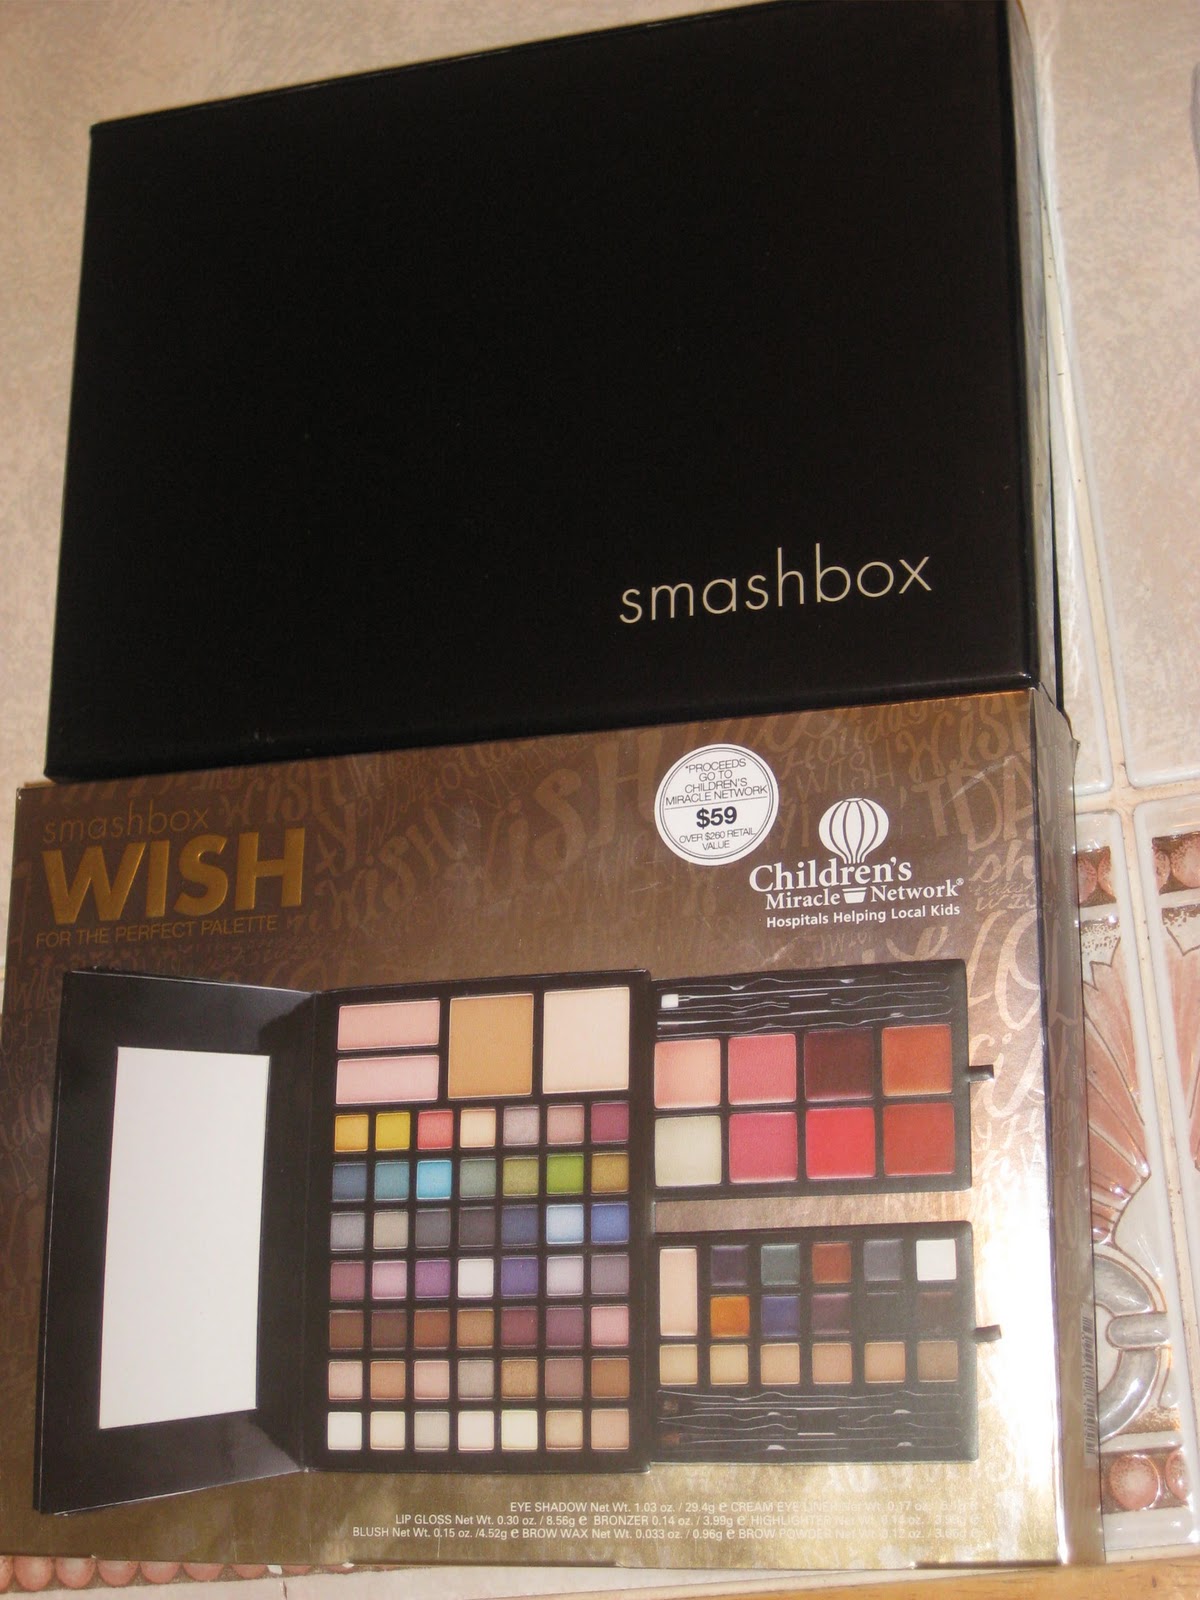
      And now on to what I got.  I was wandering around aimlessly trying to find some sort of palette that had as many eye shadows in it as possible without it costing me $200.  I had picked up a couple of NYX palettes but I knew that there would be several in them that would be pretty much unusable due to chalkiness etc.  (Not all NYX shadows are that way, in fact it's only a few of them)  And then-my Husband spotted it.  Yes, my Husband was with me.  He didn't seem to mind me walking around with a basket on my arm looking like a dear in the headlights too terribly much anyway.  He said these words "hey, what's this thing?" and that's all it took.  I fell in love with the Smashbox Wish For the Perfect Palette.  49 eyeshadows, 10 cream eyeliners (of which I previously only owned one which is NOT enough by far), 6 brow powder shades, 1 brow wax, 8 lip glosses, 2 blush, 1 bronzer, 1 highlighter and 4 mini brushes.  WOW.  Can we all just have a moment of silence in honor.......and all that for only $59!  It's a $260 retail value and it's so worth it.  Another great thing about it is that the proceeds go to the Children's Miracle Network.  I really love that aspect.  We have a Son with severe Autism and mild Mental Retardation so any time we can help build funds to go towards research, treatments and the like for kids we like to do it.
    Here are the photos I took of the kit:
    http://www.flickr.com/photos/10769175@N00/sets/72157625302656117/
      I also did a wee bit of shopping at Walmart.  They sell a brand called Hard Candy which is quite good actually.  I reviewed a small set that I bought so I could try out some of their things other than the powder my Sister gave me.  The photos are also included in the link above.  This tiny kit was $8.00 and came with a small baked bronzer, lip gloss, a glow cream that actually has 24 karat gold dust in it, and a face primer.  They are all in trial size that should last, if used every day, about 2 weeks or so.  So far I love the bronzer and glow cream the best.  The gloss is a bit sticky for me and the primer is too "sheer" for my aging skin.  But that doesn't mean it's not a good primer, I just need more assistance in that area than others.  Such is life........I also picked up a black pencil liner from Hard Candy but I'll review that in the next lot with a few lip liners and a Loreal blusher I picked up on clearance at Ulta.
      Hopefully this review is helpful to you.  If you're in the market for lots of shadows and some eyeliners to play with and a few choices of blushers and glosses the Smashbox kit is perfect for you.  It would also make a GREAT gift for anyone who enjoys make up at all.  I'm not sure how long the sale will be on so check it out if you're interested as soon as you can.
      Have a great weekend to all of you.  Thank you SO very much for stopping by to read my blog, watch my videos and check out my photos.  I will be continuing to attempt to make all of these things better for you and as always if you have any questions or would like to see anything in particular please leave me a comment either here or on YouTube and I'll definitely give it a go.  Good night and God bless you.
    Nicole

    Tuesday, November 16, 2010

    Fall-ness!


    Good day everyone!  It's always a good day to me when the leaves are all changing colors and it's slightly crisp feeling outside.  I LOVE FALL!  I'm not sure when or how it happened but fall is my absolute favorite season of all.  So, what better way to celebrate fall then with an orangie/brown make up look?!  Here are a few pictures I took-http://www.flickr.com/photos/10769175@N00/5179348525/in/set-72157625274079705/  And here's the video tutorial-http://www.youtube.com/watch?v=t8vjRHyfSAc
    Let me know if you guys would rather have all that in one place and I'll try to figure out how to get the pictures to actually be in this blog post.
    Here is a list of all the products used in the video.  I don't show myself putting on foundation and eyebrows but if you'd like to see that part just leave me a comment under the video on YouTube.

    Products used in video-
    Face:
    Loreal Studio Secrets Magic Perfecting Base (face primer)
    Chanel Matte Lumiere Liquid Foundation
    NYC Color Wheel Mosaic Face Powder in Translucent Highlighter Glow
    Jemma Kidd Show Glow Bronzing Powder in Expose 01
    Maybelline Expert Wear Blush in Sweet Cinnamon
    Beige eyeshadow with sparkle from ELF Beauty Encyclopedia Neutrals Edition for highlight

    Eyes:
    Urban Decay Primer Potion in Eden
    Coastal Scents Mica Powder in Fawn
    Jesses Girl Eye Dust in Penny Arcade
    Loreal Wear Infinite e/s in Deep Mocha
    Bare Minerals Glimmer e/s in Grace
    Loreal Wear Infinite Quad in Andie's Neutral's (deeper camel color)
    Jane Be Pure Mineral Gel eyeliner in black 04
    Make Up Forever Smoky Lash black
    Ardell Brow Pencil in Dark Brown

    Lips:
    Wet and Wild Mega Last Long wear Lip Color in 364A
    Liplicious Tasty Lip Color in Berry Blush

    Thank you all so much for taking the time to read my blog and watch the videos I make.  This is all new to me so please be patient while I figure out how to make both better for you.  God bless you!
    Love,
    Nicole